SOAP Request Response Using Groovy

Update Request XML

def groovyUtils = new com.eviware.soapui.support.GroovyUtils( context )  

// get XmlHolder for request message def 
 def holder = groovyUtils.getXmlHolder("Test Request - login - Negative#Request") 

// change password using XPath 
 holder.setNodeValue("//password", "test124")

// write updated request back to teststep 
 holder.updateProperty()
 log.info holder.xml

Fetch Value From Request and Response XML

def groovyUtils = new com.eviware.soapui.support.GroovyUtils( context )  

Request XML

// get XmlHolder for request message
 def holder = groovyUtils.getXmlHolder("Test Request - login - Negative#Request") 
// get password using XPath 
 def value = holder.getNodeValue("//password")

we can xpaths to fetch value from XML Request and response. Follow the link for XPath usage
https://testarenablog.wordpress.com/2016/08/14/xpath-in-selenium/

Response XML

// get XmlHolder for response message
 def holder = groovyUtils.getXmlHolder("Test Request - login - Negative#Response") 
 // get password using XPath 
 def value = holder.getNodeValue("//password")

Happy Testing!

Test Rail Integration With Automation Framework

Today, going to describe how you can integrate Test Rail with your automation framework using Java.

Implemented the below pattern with 2 most popular automation framework:
1. TestNG
2. Cucumber Java (BDD)

First we need Test Rail Jar. Java jar comes with the name: testrail-api-java-client.

Use the following Maven dependency to access the jar
    <dependency>
        <groupId>com.codepine.api</groupId>
        <artifactId>testrail-api-java-client</artifactId>
        <version>1.0.0</version>
    </dependency>

Test Rail Integration Flow

Pre Requisite :

  • Test Rail User have admin access to create and close Run.
  • Project –> Suite –> Test cases should exists.

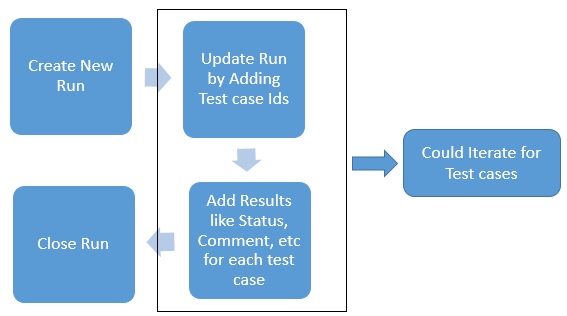
Test Rail Flow:

  1. Create a New Run under the project
  2. Add list of Test case Ids in newly created run.
  3. Add result like status, comment, etc for each test case exists in above create run.
  4. Close the Run.

TestRailFlow

Lets start with the coding

  1. Create the Test Rail Instance:
    import com.codepine.api.testrail.TestRail;
    
    private static TestRail testRail;
    private final static String endPoint = "http://testrail.company.com";
    private final static String username = "username";
    private final static String password = "password";
    
    public static TestRail createTestRailInstance() {
     if (testRail == null) {
         testRail = TestRail.builder(endPoint, username, password).build();
       }
       return testRail;
     }
  2.  Fetch Project Id and Suite Id: Require Project Id and Suite ID because further function work on RunId, TestCaseId, SuiteId and ProjectId only.
    import com.codepine.api.testrail.TestRail.Projects;
    import com.codepine.api.testrail.model.Project;
    import com.codepine.api.testrail.model.Suite;
    // **** Create getter and setter for project id and suite id. 
    // so that can be use further *********
     private static int projectId;
     private static int suiteId;
     
     public static int getProjectId() {
        return projectId;
     }
     public static void setProjectId(int projectId) {
        this.projectId = projectId;
     }
     public static int getSuiteId() {
        return suiteId;
     }
     public static void setSuiteId(int suiteId) {
        this.suiteId = suiteId;
     }
    
    // ********* Function to fetch Project id and suite Id ***********
    public static void setProjectSuiteId(String projectName, String suiteName){
     try{
         Projects projects = testRail.projects();
         java.util.List projectList = projects.list().execute();
         int pid = 0;
         int sid = 0;
         for(Project project : projectList){
            if(project.getName().equals(projectName)){
               pid = project.getId();
               setProjectId(pid);
               System.out.println(pid);
              break;
           }
        }
       if(pid !=0){
          java.util.List suiteList = testRail.suites().list(pid).execute();
          for(Suite s : suiteList){
              String sName = s.getName();
              if(sName.equals(suiteName))
              {
                 sid = s.getId();
                 setSuiteId(sid);
                 System.out.println(sid);
              }
          }
       }
     }
     catch(Exception e){
          e.printStackTrace();
       }
     }
  3.  Now Create new Run: We create run with assign all test case as false. So that we can add only those case ids which are going to execute.
    import com.codepine.api.testrail.model.Run;
    // ******* Getter and setter for Run object **************
    public static Run run;
    public static Run getRun() {
     return run;
     }
    public static void setRun(Run run) {
     this.run = run;
    }
    
    // ***** Create Run Function *********
    public static void createRun() throws ParseException{
        SimpleDateFormat format = new SimpleDateFormat("dd MMM yyy kk mm s");
        Date date = new Date();
        String dateString = format.format(date);
        String runName = "Automation " + dateString;
        try{
           run = new Run();
           run = testRail.runs().add(getProjectId(), run.setSuiteId(getSuiteId()).setName(runName).setIncludeAll(false)).execute();
           setRun(run);
        }
        catch(Exception e){
          e.printStackTrace();
       }
     }
  4. Update Run: To add test case ids at run time use the following code:
    // **** This will add case id into current run
    public static void updateRun(Object caseIdString){
     try{
         if(null != caseIdString){
         Integer caseId = Integer.parseInt(caseIdString.toString());
         caseIds.add(caseId);
         getRun().setCaseIds(caseIds);
         testRail().runs().update(getRun()).execute();
       }
     }
        catch(Exception e){
           e.printStackTrace();
       }
     }
  5. Add Result for test case in current run:
    // **** below function help to add result for a test case 
    // with comment pass in function *********
    public static void addResult(String comment, int caseId){
     try{
         if(null != testRail() ){
         List customResultFields = testRail.resultFields().list().execute();
         testRail.results().addForCase(getRun().getId(), caseId, new Result().setComment(comment), 
            customResultFields).execute();
         }
     }
     catch(Exception e){
         e.printStackTrace();
      }
    }
  6. Add final result for a test case i.e. status like pass/fail/skipped, etc. Find the Test rail Status list below:
    // **** Function use to add final status with comment for a test case ***
    public static void addStatusForCase(int statusId){
     String comment = null;
     try{
         List customResultFields = testRail.resultFields().list().execute();
         testRail.results().addForCase(getRun().getId(), getCurrentCaseId(), new Result().setStatusId(statusId), customResultFields).execute();
     }
     catch(Exception e){
         e.printStackTrace();
     }
    }
    ID Name
    1 Passed
    2 Blocked
    3 Untested
    4 Retest
    5 Failed
  7. Finally Close run:
    // ***** Close the current run ********
    public static void closeRun(){
     try{
         testRail().runs().close(getRun().getId()).execute();
       }
     catch(Exception e){
        e.printStackTrace();
       }
    }

You can use above function in any of the framework which created using java.

There are other ways also to connect Test Rail with automation framework:
1. API Client : Provided by Test Rail itself. http://docs.gurock.com/testrail-api2/bindings-java
2. Directly accessing the API using any HTTP library. http://docs.gurock.com/testrail-api2/start

Please like comment share and subscribe 😉 Happy Testing


CSS Selector in Selenium

Previously shared how we can use XPath in Selenium in the different way to solve the locator problem.

Now this blog helps you out how to effectively use CSS selector locator in selenium to identify elements.

I personally prefer CSS over XPath because it much faster than XPath. Here is the few reason for the same:

  1. XPath engines are different in each browser, hence make them inconsistent
  2. IE does not have a native XPath engine, therefore selenium injects its own XPath engine for compatibility of its API.

However, sometimes situation comes where you need to use XPath because it provides more flexibility to locate an element.

Common way to write CSS for traversing a web page is:
element[attribute=attributevalue] >(Use for Child) 
Example: div[id='navigation'] > ul[id='nav_bar']

Now, for learning purpose sharing HTML code in below link ‘CSS_Test_HTML’. Download the file and open that HTML file in chrome browser or in Mozilla firefox and try to find the element using given examples in the blog for practice.

CSS_Test_HTML

CSS Special Characters

  • dot(.) which represent a Class
    example: .testarena or div.testarena
    
  • hash(#) which represent Id
    example: #testarenaId or div#testarenaId
    

Other Pattern of CSS Selector on HTML page:

  • CSS selecting child or Subchild using white space:
    example: div[name='LearningDiv'] label[id='password']
  • CSS selection following sibling using (+):
    example:  div[class='testarena'] + div > input
  • CSS choosing the specific match. Like selecting nth number of element from a list:
    a. nth-of-type():
    example: div.table > table td:nth-of-type(3)
    b. nth-child():
    example: div.table > table td:nth-child(3)
  • CSS locate element using sub strings:
    a. (^) Match Starting string 
     example: div[name^='Learn'] or div[class^='test'] > input[id^='ab']
    b. ($): Match End String
     example:
     div[name$='Div'] or div[class$='arena'] > input[id$='01'] or div[class$='arena'] > input[id^='ab']
    c. (*): Match in between string
     example: div[name*='rning'] or div[class*='tare'] > input[id$='01']
  • CSS Contains:
    example: css=a:contains('google link')


All the example given in above blog can be tested in attached html code. just follow the instruction mention above.

Please comment for any questions and doubts.

Happy Testing!

Send Email in Soap UI using Groovy

Hi Guys,

Here is the code to send email in SoapUI using groovy.

Requirement: Java Mail Jar file location
http://www.java2s.com/Code/JarDownload/java/java-mail-1.4.4.jar.zip

// Note: Generally in SoapUI no need of java mail jar file but if require then can download from above link and save at ext directory.

Pre-Requisite Setting on Gmail for avoiding authentication error:

Before using below code  follow below steps for Gmail access:
1. Login to Gmail with UserName and Password which you are going to use as the sender.
2. Then, open https://www.google.com/settings/security/lesssecureapps
3. Change the Security to “Turn On”.

After that update, the username and password in function calling and run the step.

Sending email "Gmail" SMPT server:

import com.sun.mail.smtp.SMTPTransport;
import java.security.Security;
import java.util.Date;
import java.util.Properties;
import javax.mail.Message;
import javax.mail.MessagingException;
import javax.mail.Session;
import javax.mail.internet.AddressException;
import javax.mail.internet.InternetAddress;
import javax.mail.internet.MimeMessage;

public static void Send(final String username, final String password, String recipientEmail, String ccEmail, String title, String message) throws AddressException, MessagingException {
        final String SSL_FACTORY = "javax.net.ssl.SSLSocketFactory";

        // Get a Properties object
        Properties props = System.getProperties();
        props.setProperty("mail.smtps.host", "smtp.gmail.com");
        props.setProperty("mail.smtp.socketFactory.class", SSL_FACTORY);
        props.setProperty("mail.smtp.socketFactory.fallback", "false");
        props.setProperty("mail.smtp.port", "465");
        props.setProperty("mail.smtp.socketFactory.port", "465");
        props.setProperty("mail.smtps.auth", "true");

        /*
        If set to false, the QUIT command is sent and the connection is immediately closed. If set 
        to true (the default), causes the transport to wait for the response to the QUIT command.

        ref :   http://java.sun.com/products/javamail/javadocs/com/sun/mail/smtp/package-summary.html
                http://forum.java.sun.com/thread.jspa?threadID=5205249
                smtpsend.java - demo program from javamail
        */

        props.put("mail.smtps.quitwait", "false");

        Session session = Session.getInstance(props, null);

        // -- Create a new message --
        final MimeMessage msg = new MimeMessage(session);

        // -- Set the FROM and TO fields --
        msg.setFrom(new InternetAddress(username + "@gmail.com"));
        msg.setRecipients(Message.RecipientType.TO, InternetAddress.parse(recipientEmail, false));

        if (ccEmail.length() > 0) {
            msg.setRecipients(Message.RecipientType.CC, InternetAddress.parse(ccEmail, false));
        }

        msg.setSubject(title);
        msg.setText(message, "utf-8");
        msg.setSentDate(new Date());

        SMTPTransport t = (SMTPTransport)session.getTransport("smtps");

        t.connect("smtp.gmail.com", username, password);
        t.sendMessage(msg, msg.getAllRecipients());      
        t.close();
    }

Use below pattern to call the above create function:
log.info Send(username, password, recipientEmail, ccEmail, title, message);
Example: 
log.info send("sampleUser", "SamplePassword", "samplerecipient@gmail.com", "sampleccmail@yahoo.com", "Test Subject", "Body of the mail")


Point to remember: While Calling does not give username complete email address, provide the only username like if Gmail-Id: samplegmailid@gmail.com then in function enter samplegmailid.

Original Post link: https://saurabhguptaqe.blogspot.in/2013/08/send-email-in-soap-ui-using-groovy.html

Cheers! Happy Testing!
XPATH in SELENIUM

XPath – Very common word and locator for automation tester life. Especially for those who use Selenium (Webdriver). Everyone use XPath as locator but still found confused in interviews.

Sharing how to use XPATH effectively in your automation and for interviews also.

What is XPATH?

  • XPATH is designed to allow the navigation of XML documentation with the purpose of selecting different elements of an XML document.
  • When you need to search for an address, you should know what is your starting point to reach your destination.
  • In XPath, the starting point is called the context node.

Examples:

  • html/body/form (Absolute)
  • //input or // input[@id=‘input1’]

Type of XPath

Absolute XPATH:

  • Absolute XPath starts with the root node or a forward slash (/).
  • The advantage of using absolute is, it identifies the element very fast.
  • Disadvantage here is, if anything goes wrong or some other tag added in between,
    then this path will no longer work Example: Html/body/form

Relative XPATH:

  • A relative XPath is one where the path starts from the node of your choice – it
    doesn’t need to start from the root node. It starts with Double forward slash(//)Example: //input or //input[@id=‘input1’]

Structure of XPath:

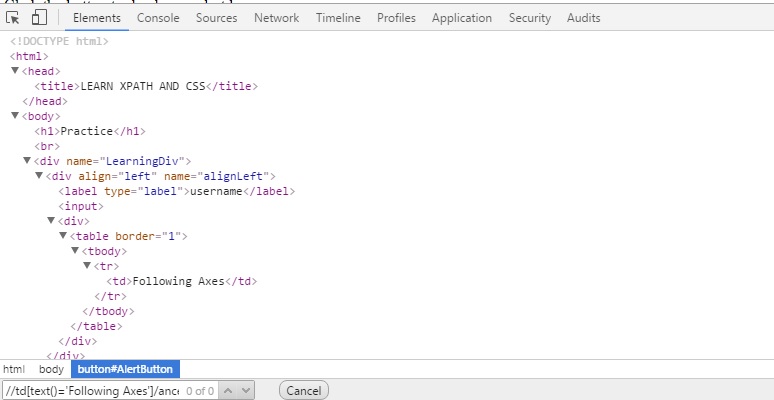
Sample HTML structure:SampleHTMLStructure

//div[@name='alignLeft']: 'div' is an element/tag name appear in HTML format shown above. @name is an attribute and 'alignLeft' is the value of attribute.

So format is: //element[@attribuutename='attrbutevalue'].

TRICKY ATTRIBUTE: If there is no attribute in an element and need to give text of the element then use the following structure: //Element[text()=’textvalue’]

Example from above image only: //label[text()='username'].

Now, for learning purpose sharing HTML code in below link ‘XPath_Test_HTML’. Download the file and open that HTML file in chrome browser or in Mozilla firefox and try to find the element using given examples in the blog for practice.

XPath_Test_HTML

10 Different way of creating XPATH while using Selenium

  1. Parent Axes: It looks for immediate parent element
    //input[@id='row']/parent::td
    Same can be written as 
    //input[@id='row']/..
  2. Child Axes: It looks for immediate child element
    //div[@name='alignLeft']/child::label
    same can be use as:
    //div[@name='alignLeft']/label
  3. Following Axes
    //label[text()='username']/following::table
    In above example: it will search a ‘Table’ element which come after ‘Label’ having text as ‘username’. It does not take care of hierarchy.
    Another example: //label[text()='username']/following::label
  4. Following-sibling axes: It looks for an element which appears at the same hierarchy. And as the name suggest it will look for following matching element from the given element.
    //label[text()='username']/following-sibling::input


  5. Preceding Axes
    //td[text()='Following Axes']/preceding::input

    In above example: it will search the ‘input’ element which comes before ‘td’ i.e. table cell having text as ‘following axes’. It does not take care of hierarchy.

  6. Preceding-sibling: It look for the element which appears at the same level, no child no parent element. Ans as the name suggest it will look for preceding matching sibling element.
    //label[text()='password']/preceding-sibling::input
  7. Descendant: It helps to select child or sub child element.
    //div[@name='alignLeft']/descendant::label
  8. Ancestor :

    //td[text()='Following Axes']/ancestor::table
    
    
  9. XPath selecting child or Subchild using white space.
    //div[@name='alignLeft']//table
  10. XPath with mention position.
    //div[position()=1]

All the example given in above blog can be tested in attached html code. just follow the instruction mention above.

Please comment for any questions and doubts.

FYI: XPath itself its a very big topic to understand. Above mention ways are the collection of those which solve 99% of locator problem in automation.

Happy Testing! Remove fear of XPATH in an interview!

SoapUI Command Line Execution

Running functional tests from the command-line is straightforward using the included testrunner.bat/.sh script, which takes a number of arguments to control which tests to run, output, and so on.

For Example:

Step1: Go to TestRunner batch file location. Like in Windows: C:\Program Files\SmartBear\SoapUI-5.2.0\bin

Step2: Execute the following command:

Windows: testrunner.bat -s"TestSuiteName" -c"TestCaseName" <project Path>
Unix/Mac: testrunner.sh -s"TestSuiteName" -c"TestCaseName" <project Path>

Where Project Path: Path of Project where it has saved. (Project saved as XML file in SoapUI)
TestSuiteName: SoapUI SuiteName under above mention Project.
TestCaseName: Test Case Under Above SuiteName

Sample Image:

CommandLineExecution

Different Arguments which can use for execution:

  1. s: The TestSuite to run, used to narrow down the tests to run
  2. c: The TestCase to run , used to narrow down the tests to run
  3. a: Turns on exporting of all test results, not only errors
  4. D: Sets system property with name=value
  5. P: Sets project property with name=value, e.g. -Pendpoint=value1

There are many more arguments. Check below link for reference: http://readyapi.smartbear.com/features/automation/cli/functional/params?_ga=1.27782588.142681184.1434169100

Point to Remember:
       a. Arguments are case sensitive
       b. Few of argument are specific for Pro version.

Change Endpoint Using Groovy

Now a days, most webserives are either SOAP or REST and if your test suite have test case where different request have different endpoint so how we can automate that using groovy.

Code: testRunner.testCase.getTestStepByName(TestStepName).getHttpRequest().setEndpoint(EndPointUrl)

where TestStepName is name of the webservice step either Soap or Rest and EndPointUrl is the new end point url which you will require to set.

Another way of doing the same is, endpoint is the property of webservice test step so below code can also used for the same:

Code : testRunner.testCase.properties['endpoint'].setValue('new endpoint')

Update All Requests Endpoint in a TestSuite 

Now if require to do change all the webservice endpoints exists in a test suite dynamically, then for that you need to traverse all the test cases and all the steps because at run time you do not know how many webservice test steps are there in a Test case and how many test cases in a suite which need to execute.

Code:
// *** Get the All test steps name from a test case ***
oNameList = testRunner.testCase.getTestStepList().name
for(iNameCounter in 0..oNameList.size-1)
{
   sStepType = testRunner.testCase.testSteps[oNameList[iNameCounter]].config.type
   if (sStepType.toUpperCase() == "REQUEST")

     {  testRunner.testCase.testSteps[oNameList[iNameCounter]].getHttpRequest().setEndpoint(sEndPointUrl)
     }
}

Above code will change the all the request end point exist in a test case.

Cheers! Happy Testing!


REST API in SOAPUI

REST (Representational State Transfer) is a simple stateless architecture that generally runs over HTTP.

REST can use four different HTTP  verbs (GET, POST, PUT, and DELETE) to perform CRUD tasks.

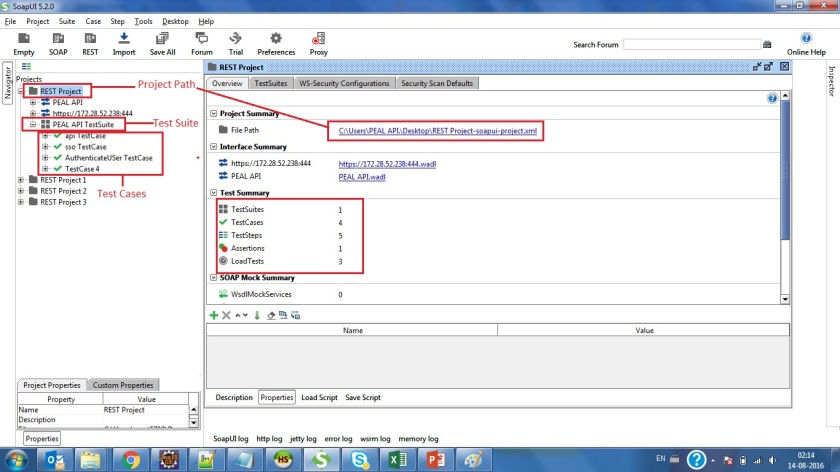
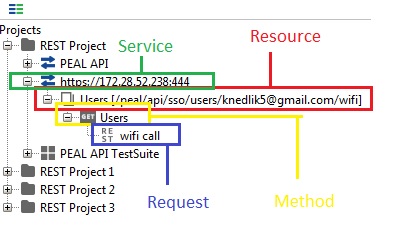
Start with Rest Project in SoapUI

RESTProjectHirarchy

How to Add New REST Project in SoapUI:

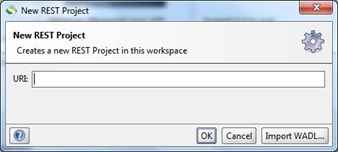
  1. Directly providing the URI:
    REST_URI
  2. Importing the WADL
    REST_WADL

REST Parameters:

There are different type of parameters available in SoapUI:

  1. Query : Most common parameter which append with URL after ‘?’ in the path
  2. Template: Template parameters are a flexible way of parameterizing the actual path of the request
  3. Header : Header parameters are instead added as HTTP Headers to the outgoing request
  4. Matrix : Matrix parameters are another way of defining parameters to be added to the actual path of the resource, but before the query string.

Parameter can be defined at 2 different levels:

REST_ParametersType

Parameters sample in request:

REST_Parameters

SoapUi allows to add as many WADL/API URL in a single project. Each will have its own hierarchy and will be shown in a similar manner mention in starting of the project.

 Basic Information on Different Method of REST API:

REST_Methods

  1. POST: Used to create a new entity, but it can also be used to update an entity.
  2. GET: Used to fetch/retrieve information.
  3. PUT: PUT can create a new entity or update an existing one. A PUT request is idempotent.
    Idempotent means: Request can be call multiple time without different outcomes.
  4. PATCH: Used to update only specified fields of an entity at a URI. A PATCH request is also idempotent.
  5. DELETE: Used to delete a resource.

Approach for Effective Automation Framework

Preface: This blog is not related to different kind of automation frameworks. It is about the thing need to consider during planning phase for Automation framework.

A well-defined automation framework helps to maintain higher re-usability and develops easily maintainable scripts. It is very important to choose an effective automation framework for any project or organization which is more effective and can be used across projects and have higher ROI from the automation project.

To consider a framework, we must understand the requirements and select an approach to create an effective automation framework. Below mentioning few points which are important to consider to create an effective framework.

  • What all kind of application need to automate? It might be Web, Webservices/API, Mobile, Desktop, specific application like Oracle, SAP, etc.
  • Flow requirement?  Single application or combination frontend and backend.
  • Who all are going to use this automation framework for execution?It can be used by QA, Developer or business people as well
  • What kind of reporting we require?
  • Do you require any separate logging for debugging?
  • Is your framework require Performance Testing using those functional scenarios?
  • Is any requirement of GUI testing?
  • Do you require CI/CD integration?
  • Do you require Code coverage also?
  •  Do you require Big Data integration too?

Epilogue : If we are clear of what we require then we can move to selecting tool, technologies, methodologies to create an effective framework. To achieve desired benefits the framework must be accurately designed and developed.

A Goal without planning is just a Dream